|
|
|
|
The Integration Management Utility (IMU) is a stand-alone utility that can be used to help manage the steps necessary to load import files into or initiate export files out of Unanet. This utility is downloaded and installed separately from the Unanet product on the platform where the imports or exports are being originated.
When used to facilitate the importing of data into Unanet, the utility can be configured to help manage the triggering of file preparation (from an upstream system), the subsequent calling of the Unanet Command Line Import to load the files, file management to store copies of import files and resulting logs, error parsing, as well as the sending of email notifications should an error condition be detected.
When used to facilitate the exporting of data from Unanet, the utility can be configured to help invoke the Unanet Command Line Export, file management to store copies of exported files and resulting logs, error parsing, as well as sending of email notifications should an error condition be detected.
The package includes a number of "configuration" files that will need to be modified during initial setup.
Topics covered on this help page include:
Requirements (prerequisite system requirements)
Installation (how to install the IMU)
Import Overview and Configuration (how to configure the IMU for Import operations)
Export Overview and Configuration (how to configure the IMU for Export operations)
Scheduling (administrators will likely desire to schedule the running of the IMU on a periodic basis)
UNC (support for UNC file naming)
You may also be interested in:
Command Line Import (utility that allows for the execution of a Unanet import external to the user interface)
Command Line Export (utility that allows for the execution of a Unanet export external to the user interface)
IMU Upgrade Instructions (how to upgrade your IMU to the latest version)
You must have Java installed on the server invoking the IMU program.
|
Server Requirements |
|
|
Java |
|
|
Operating System |
|
See Install Java for additional information.
Please note that if you are installing the IMU on the same server that your Unanet servlet is on, you already have Java installed and can simply use the existing version.
This section details the installation and configuration of the IMU. If you have previously installed the IMU and you are attempting to install an updated version, please see IMU Upgrade Instructions.
Again, Unanet Support and/or Unanet Professional Services personnel will assist you with the installation and configuration of this utility and the accompanying configuration files, so unless you are already familiar with the IMU, please consult a qualified Unanet representative the assist you in configuring the IMU.
The IMU installation package is available for download from the Unanet Support site. If you log into the support site and click on downloads, there is a “blue bar” titled “Interface Management”. There you can download the IMU windows installer and the latest Import.jar and/or Export.jar file. Note that the Import.jar and Export.jar are included in the IMU installation package, but should you ever need to upgrade either of them, you may download them from the support site independently of the IMU.
You can contact Unanet Technical Support should you require assistance downloading the installation package. Unanet Support and/or Unanet Professional Services personnel will assist you with the installation and configuration of this utility and the accompanying configuration files.
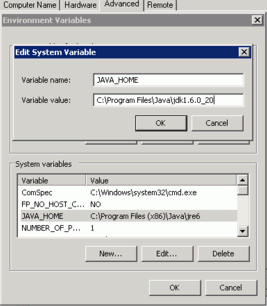
Find “My Computer” and right-click on it, selecting Properties.
Navigate to the Advanced Settings>Environment Variables screen.
Look in the System Variables section to see if there is a JAVA_HOME entry. If there is not, add one using the directory of the Java installation installed in the previous step. If the JAVA_HOME entry is already there make sure it is pointing to a compatible version of Java.
Download the IMU installer - Once you have downloaded the IMU windows installer, double-click on the unanet_imu.exe file and follow the installation instructions. This will create the IMU directory structure on your system.
This section itemizes a few of the important components of the IMU that pertain to Imports. There are only really two files that you should have to update (imu_pre_build.xml and imu_config.properties). Please do not modify any other files in the IMU directory as this could prevent future functionality from working correctly.
imu_pre_build.xml (configuration file typically used to kickoff generation of files to be imported into Unanet)
imu_config.properties (configuration file used to define which imports to run and related parameters)
imu_build.xml (configuration file used to define the specific import steps included when running the utility)
unanet_imu.bat (bat file used to run the entire import IMU process)
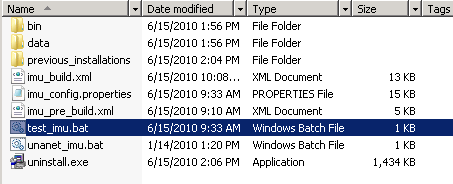
test_imu.bat (bat file used to test your import setup configuration)
The imu_pre_build.xml file is used to execute your custom process which pulls and formats data from an external system into files that the Unanet import can understand. Examples of this could be SQL Plus scripts, stored procedures, or other custom processes.
The imu_pre_build.xml file will need to be carefully modified to add in the necessary steps to trigger the generation of the files that will eventually be imported into Unanet. The specific details of what will be included within this xml file will likely be somewhat customized to each customers particular need (e.g. it will depend on what system or systems house the data you are looking to feed into Unanet and the number of feeds you are looking to manage).
You can review the comments within the file to get a more thorough understanding of the supported functionality.
Even if you are not planning on using the IMU to kickoff the process which generates your Import files, you will still need to minimally set the imu_pre_build.xml file up to copy or move the files from an external location into the IMU’s dynamic directory structure for processing. See the last commented “move” example in the imu_pre_build.xml file for an example of how to accomplish this.
The imu_config.properties file is used to supply specific information about which Unanet imports will be included in the integration, along with details as to which parameters are desired, the sequence of the imports to be run, etc. This file is additionally used to supply email address information for error reporting as well as file directory information (as the IMU creates copies of imported files, resulting error logs, etc).
You can review the comments within the file or see the Installation and Configuration section below to get a more thorough understanding of the supported functionality.
The imu_build.xml file is an ant build file that contains the main steps that will be executed during an invocation of the interface. Steps include validation of email and import processes as well as purging older files and more.
You can review the comments within the file to get a more thorough understanding of the supported functionality.
It is not anticipated that this file will need to be modified. If you do modify this file, keep in mind that any changes you make may be overridden in subsequent versions of the IMU.
The unanet_imu.bat file is the file that is used to kickoff and run the IMU process. It basically runs a single 'ant' command where all the other configuration files are used to manage the file processing. If you plan to schedule the IMU, this is the file that you will execute.
The test_imu.bat file is the file can be used to test your setup configuration. Once you have completed your customization of the imu_config.properties file, you can simply execute this bat file and it will do the following:
Validate that the IMU can find the Import.jar file
Validate that the IMU can successfully reach the Unanet servlet as defined in your imu_config.properties file
Send a test email according to the values you have set up in your imu_config.properties file
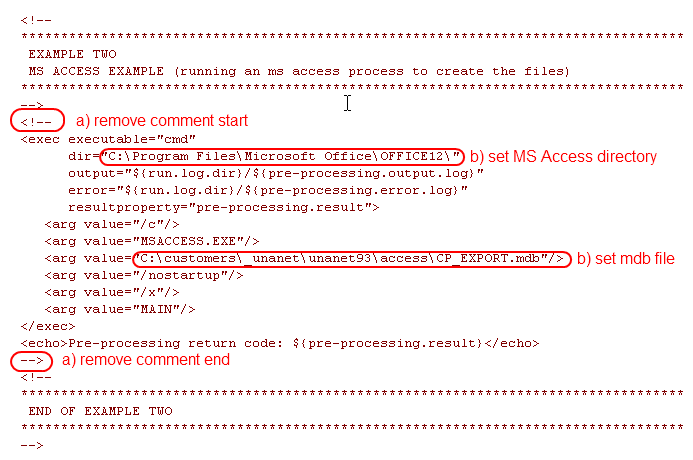
Configure the imu_pre_build.xml – Edit this file using any text editor such as Notepad.
There are several commented out examples already in the file. Identify which type of system you are going to be using and uncomment the appropriate example to use as a starting point. You may want to simply delete the examples you will not be using so that there is less clutter in this file. In the following example, we will be using the MS ACCESS process, so that is the section we will need to uncomment.
Set the “dir” parameter to the directory on your system where the MS Access executable (msaccess.exe) is located. Also set the argument that specifies the Access mdb file, in this case, CP_EXPORT.mdb.
Locate the Move example in the file. This logic allows the files created by the MS Access step to be moved to the correct IMU runtime directory. A new runtime directory is created for each run, so the “todir” parameter should remain as shown below. What you will need to change will be the “file” parameter. You will need to have a move line for each file that your MSACCESS or other external process creates.
Configure the imu_config.properties - Edit this file using any text editor such as Notepad. This is where a majority of customization will take place. There are several important properties that will need to be set up for you installation.
Update the “unanet.url” property to reflect your Unanet system’s URL. Defines the URL to your Unanet System. This will normally be the same url that you use in your browser when accessing your Unanet system. Do not forget to include the context ("unanet" in the example below, your context may be different).
unanet.url=http://example.mydomain.com/unanet
Set the “username” and “password” properties to the username and password of the admin account that will be executing the interface:
username=admin
password=password
Define the e-mail accounts you would like error message sent from and to. If set, any errors generated by the import process will be sent as attachments to the specified email recipients. The “email.host” must be a valid smtp email server capable of sending email from this server to the desired recipients. You may specify multiple email addresses in the ”email.from” and/or “email.to” properties by separating them with commas. If you wish to test your email settings prior to importing, you can run the command to test the email by issuing the following: test_imu.bat and test_imu_export.bat
email.host=smtp.mydomain.com
email.from=Admin admin@mydomain.com
email.to=Finance finance@mydomain.com
The following properties will only need to be modified if your email system has any special requirements.
email.ssl=false
email.port=25
email.enableStartTLS=false
email.user=your_email_user_name
email.password=your_email_user_password
The following property, when set to false, will only send an email if an error is detected. Should you desire positive reporting, setting this property to true will result in an email being sent each time the IMU is run.
positive.reporting=false
Set the “run.imports” property to specify the type and order of imports that will run. There is a list of valid types above this property in commented section. The attributes for each import type you are using will be defined in the next step. If you need to run multiple files of the same type (Ex. Approval Group for Time and Expense), you will need to rename them, essentially creating your own type. As we will see in the next section, the attributes for each type (standard or custom) are easy to define.
run.imports=person,assignment,approval_group_time,approval_group_expense
Enter any global arguments in the “global-args=” property. This is optional and defaults to the “errors” setting, meaning that only error messages will be used in the output.
####################################################################
# Global arguments passed to all imports.
# Possible values:
# --option outputOption=[all,warnings,errors]
####################################################################
global-args=--option outputOption=warnings
Configure the attributes for each import you are using. By default, the imu_config.properties file has one section of attributes per valid file type. There can be up to five possible attributes per type, although some have less. They are prefixed with the default type names. For example, to set the assignment attributes look for the lines that begin with “assignment.” In the previous step, a note is mentioned regarding running multiple imports of the same type. That example included two approval group type imports, one for time, the other for expense. To specify the attributes for each, you would copy the standard “Approval Group” section and prefix each value with the same tag name you used in the “run.imports” line in the previous step. To continue the example, we need an “approval_group_time” and an “approval_group_expense” section. Please note that the “*.import.type” is still set to “approval_group” in both cases so that the IMU knows they are both Approval Group imports. The other attributes (like the input file and the log file) should be set to different values to reflect the different runs of the import.
####################################################################
# Approval Group (Time) Import Properties
# Additional Arguments: none
####################################################################
approval_group_time.input.file=approval_group_t.csv
approval_group_time.log.file=approval_group_t.log
approval_group_time.import.type=approval_group
approval_group_time.skip-file-check-warning=true
####################################################################
# Approval Group (Expense) Import Properties
# Additional Arguments: none
####################################################################
approval_group_expense.input.file=approval_group_e.csv
approval_group_expense.log.file=approval_group_e.log
approval_group_expense.import.type=approval_group
approval_group_expense.skip-file-check-warning=true
####################################################################
# Person Import Properties
# Additional Arguments:
# --option update_passwords=true
# --option adjust_extracted=true
####################################################################
person.input.file=person.csv
person.log.file=person.log
person.import.type=person
person.skip-file-check-warning=true
person.args=--option update_passwords=true
####################################################################
# Assignment Import Properties
# Additional Arguments:
# --option notifyUser=true
# --option notifyPM=true
# --option additionalEmail=you@abc.com,me@abc.com
# --option allowLinkDates=true
####################################################################
assignment.input.file=assignment.csv
assignment.log.file=assignment.log
assignment.import.type=assignment
assignment.skip-file-check-warning=true
assignment.args=
…
Test the IMU with the test_imu.bat file – This file will initiate the IMU process and run a few checks to ensure your configuration is valid. One of the checks will send a test email to the recipients you have defined in the “email.to” property.
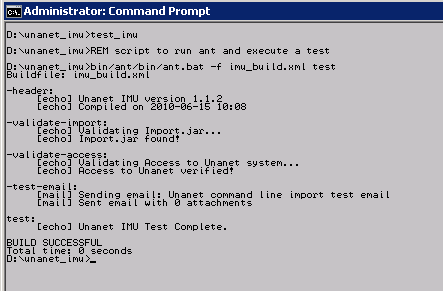
At the Windows cmd prompt, execute the test_imu.bat program and examine the output. If everything is setup correctly, it should appear as follows, and a test email should be sent to the correct email recipients:
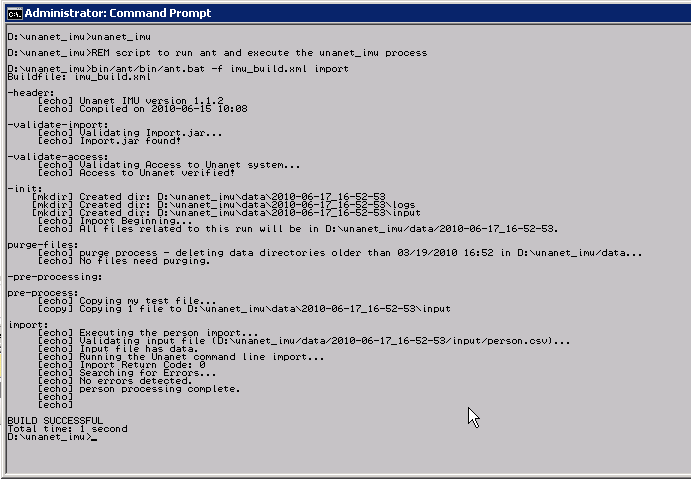
Run the IMU with the unanet_imu.bat file – This file will initiate the IMU process and run the actual imports as you have configured them. The output of this command will be different depending on how your system is configured, but here is an example:
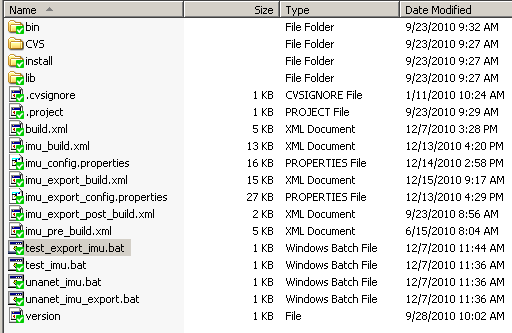
This section itemizes a few of the important components of the IMU that pertain to Imports. There are only really two files that you should have to update (imu_pre_build.xml and imu_config.properties). Please do not modify any other files in the IMU directory as this could prevent future functionality from working correctly.
imu_export_post_build.xml (configuration file typically used to kickoff post processing after the export from Unanet)
imu_export_config.properties (configuration file used to define which imports to run and related parameters)
imu_export_build.xml (configuration file used to define the specific import steps included when running the utility)
unanet_imu_export.bat (bat file used to run the entire import IMU process)
test_export_imu.bat (bat file used to test your import setup configuration)
The imu_export_post_build.xml file is used to execute your custom process which may be needed to further process the resulting export files. Examples of this could be running a downstream import, or some other custom processes.
The imu_export_post_build.xml file will need to be carefully modified to add in the necessary steps to trigger any desired post-processing. The specific details of what will be included within this xml file will likely be somewhat customized to each customers particular need (e.g. it will depend on your company's individual post-processing needs).
You can review the comments within the file to get a more thorough understanding of the supported functionality.
You may not require any type of post-processing at all. If, for example, you have your export template setup to email the resulting file, there may be no further need for any additional processing.
The imu_export_config.properties file is used to supply specific information about which Unanet exports will be included in the integration, along with details as to which parameters are desired, the sequence of the exports to be run, etc. This file is additionally used to supply email address information for error reporting as well as file directory information (as the IMU creates copies of exported files, resulting error logs, etc).
You can review the comments within the file or see the Installation and Configuration section below to get a more thorough understanding of the supported functionality.
The imu_export_build.xml file is an ant build file that contains the main steps that will be executed during an invocation of the interface. Steps include validation of email and export processes as well as purging older files and more.
You can review the comments within the file to get a more thorough understanding of the supported functionality.
It is not anticipated that this file will need to be modified. If you do modify this file, keep in mind that any changes you make may be overridden in subsequent versions of the IMU.
The unanet_imu_export.bat file is the file that is used to kickoff and run the IMU export process. It basically runs a single 'ant' command where all the other configuration files are used to manage the file processing. If you plan to schedule the IMU, this is the file that you will execute.
The test_export_imu.bat file is the file can be used to test your setup configuration. Once you have completed your customization of the imu_export_config.properties file, you can simply execute this bat file and it will do the following:
Validate that the IMU can find the Export.jar file
Validate that the IMU can successfully reach the Unanet servlet as defined in your imu_export_config.properties file
Send a test email according to the values you have set up in your imu_export_config.properties file
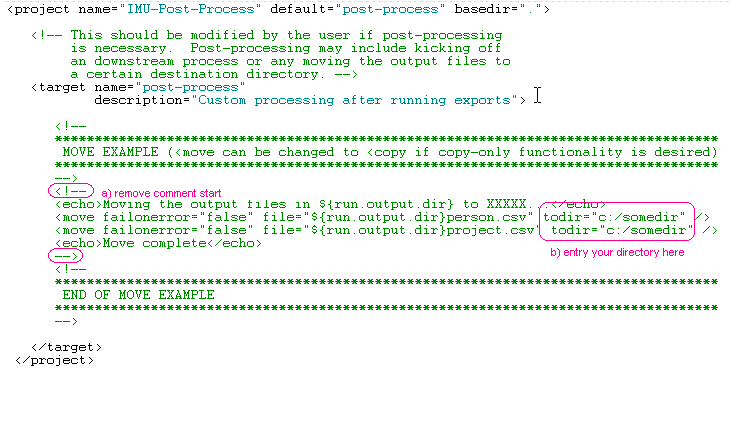
Configure the imu_export_post_build.xml – Edit this file using any text editor such as Notepad.
There is one commented out example already in the file. This example copies the resulting export files to an external directory. Remember, if the IMU export process is configured to create export files, they are stored inside the dynamic set of data directories unique for each run. If you intend to do something with those files, you will most likely want to copy them to an external directory for further processing.
To use this example, first uncomment the copy example (a) then set the “todir” parameter for each file you wish to copy (b).
Configure the imu_export_config.properties - Edit this file using any text editor such as Notepad. This is where a majority of customization will take place. There are several important properties that will need to be set up for you installation.
Update the “unanet.url” property to reflect your Unanet system’s URL. Defines the URL to your Unanet System. This will normally be the same url that you use in your browser when accessing your Unanet system. Do not forget to include the context ("unanet" in the example below, your context may be different).
unanet.url=http://example.mydomain.com/unanet
Set the “username” and “password” properties to the username and password of the admin account that will be executing the interface:
username=admin
password=password
Define the e-mail accounts you would like error message sent from and to. If set, any errors generated by the export process will be sent as attachments to the specified email recipients. The “email.host” must be a valid smtp email server capable of sending email from this server to the desired recipients. You may specify multiple email addresses in the ”email.from” and/or “email.to” properties by separating them with commas. If you wish to test your email settings prior to exporting, you can run the command to test the email by issuing the following: test_imu.bat and test_imu_export.bat
email.host=smtp.mydomain.com
email.from=Admin admin@mydomain.com
email.to=Finance finance@mydomain.com
The following properties will only need to be modified if your email system has any special requirements.
email.ssl=false
email.port=25
email.enableStartTLS=false
email.user=your_email_user_name
email.password=your_email_user_password
The following property, when set to false, will only send an email if an error is detected. Should you desire positive reporting, setting this property to true will result in an email being sent each time the IMU is run.
positive.reporting=false
Set the “run.exports" property to specify the type and order of exports that will run. You can create any number of exports here, but each one must be defined using a set of common properties prefixed with the name you create. Each export you define can have a specific set of properties defined below.
run.exports=mytime1,mytime2,lab_cat_master
Each export you define can have the following properties specified (remember the name prefix for each property, in this example, "lab_cat_master"):
REQUIRED PROPERTIES:
exp_name.output.file=<your-file-name>
This is the file which will contain the output from the export. Do not use a full path here, only the file name since the output will all go into a date/time stamped run directory. If you need to have the file go somewhere upon completion, set up a post-process step.
exp_name.log.file=<your-log-file-name>
This is the file which will contain any logging or error information.
exp_name.export.template=<your export template name>
This is where you specify the name of the export template you wish to run. These must be defined in your Unanet system prior to running the IMU.
exp_name.empty-output-file-ok=[true,false]
If this property is set to true, any resulting "empty" output file from an export will NOT be treated as an error. If the property is set to true, resulting empty files will be treated as an error.
OPTIONAL PROPERTIES
exp_name.saved-criteria=<your saved export criteria name>
This is where you specify the saved export criteria that you wish to use. These must be defined in your Unanet system prior to running the IMU.
exp_name.args=<any additional options you wish to pass>
Here you can pass additional arguments to the export process. If you are trying to use more than one option, for example, if you want to include two role keys in your criteria, simply include "--option rolekeys=1 --option rolekeys=2 ..." on the command line. Some more common options are listed in the example blocks of export configurations in the imu_export_config.properties file. Please see the Unanet help documentation for value options for various types of exports.
EXAMPLE
The following example would export using the template called "Labor Category - Master" and the saved criteria for that template type called "My Saved Criteria". It will save the resulting output into a file called "lab_cat_master.csv" and would filter the data looking for Labor Categories with a key of 5 and 6. The IMU will not consider it an error if the file is empty.
####################################################################
# Labor Category - Master Export Properties
# Additional Arguments:
# --option labor_category=5 (lab cat key)
# --option dateRange_bDate=01/01/2010
# --option dateRange_eDate=01/31/2010
####################################################################
lab_cat_master.output.file=lab_cat_master.csv
lab_cat_master.log.file=lab_cat_master.out
lab_cat_master.export.template=Labor Category - Master
lab_cat_master.saved-criteria=My Saved Criteria
lab_cat_master.empty-output-file-ok=true
lab_cat_master.args=--option labor_category=5 --option labor_category=6
…
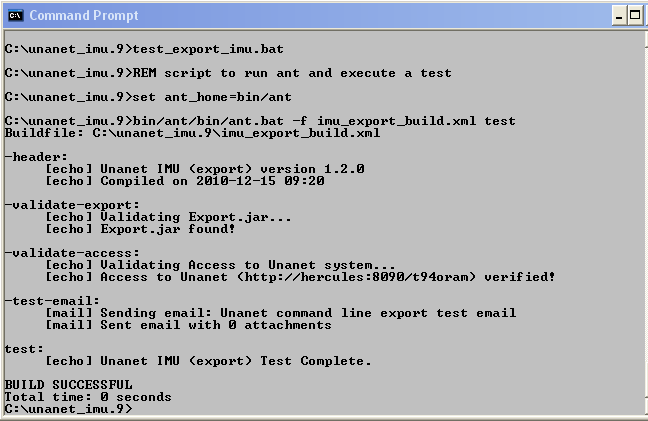
Test the IMU with the test_export_imu.bat file – This file will initiate the IMU process and run a few checks to ensure your configuration is valid. One of the checks will send a test email to the recipients you have defined in the “email.to” property.
At the Windows cmd prompt, execute the test_export_imu.bat program and examine the output. If everything is setup correctly, it should appear as follows, and a test email should be sent to the correct email recipients:
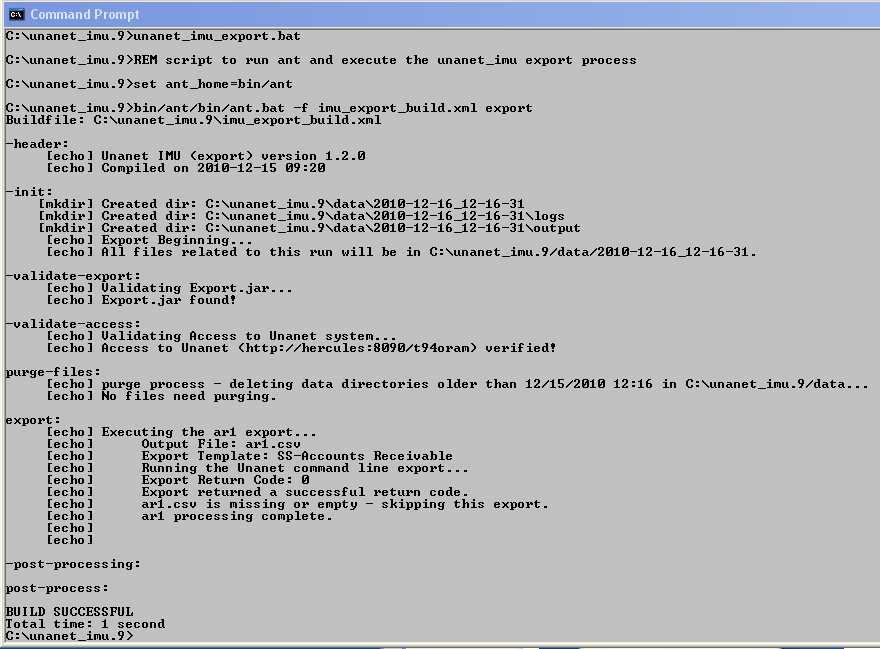
Run the IMU with the unanet_imu_export.bat file – This file will initiate the IMU process and run the actual exports as you have configured them. The output of this command will be different depending on how your system is configured, but here is an example:
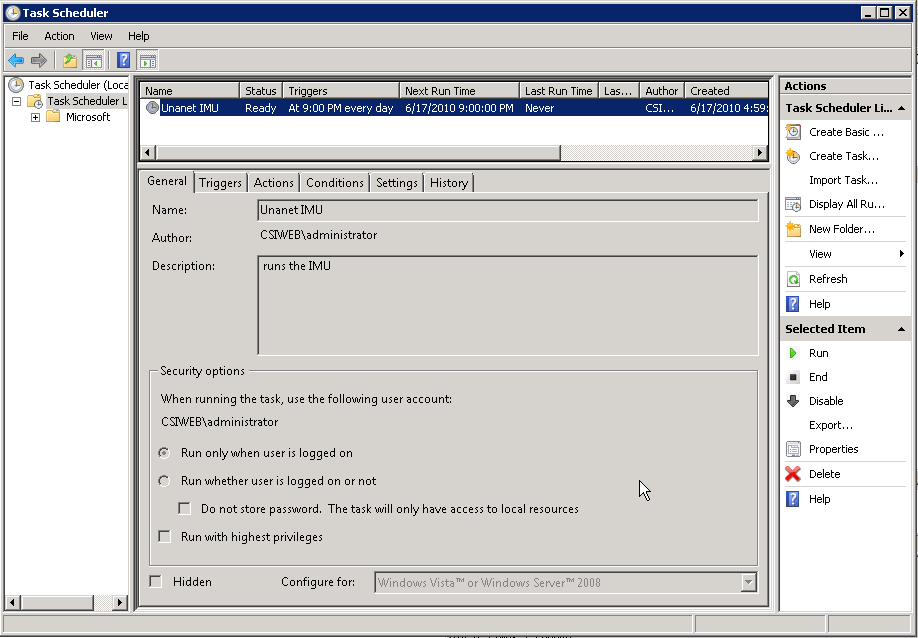
The system administrator managing the server running the IMU utility will need to investigate the scheduling of this utility using a scheduler native to the operating system used (e.g. Windows Scheduler, cron, etc.). Using the scheduling tool on you system, set the unanet_imu.bat file and/or unanet_imu_export.bat file to run at the desired interval.
Whether you can use a UNC naming convention and how you would format the appropriate syntax will depend on what permissions the user set up to run the IMU has and what operating system you are working with. In general, however, Unanet does not prevent the use of UNC file naming.
To determine in your situation you will likely need to do some experimentation with the user id you'll be using from the machine you'll be using it on.
Here are a few options you can try out:
Use forward slashes, for example, try //directory/directory/filename. In general, ant scripts better handle those types of slashes (even on windows platforms).
If that doesn’t work, you could try backslashes, for example, try \\directory\directory\filename.
Finally, you could try to establish a network share and give that path a drive letter assignment and share name – then use that new share name in the IMU configuration (i.e., z:/share_name/filename).
Again, because the final result is dependent on several variables, you may need to experiment to see which one will work in your situation.