|
|
|
|
The People Planner is available for customers that prefer to manage planned work entries for multiple projects and multiple users on a single screen (possibly for multiple periods). In addition to entering hours in the convenient matrix layout, this screen also has powerful editing capabilities which can be used to modify planned work details for one or many users or projects. This screen is comprised of a Search and Plan tab and is available to users with Administrator and Resource Planner roles.
Note that this screen can be used to plan:
Projects and People for one period
People for many Projects
Projects for many People
This screen can be used to view existing planned work entries as well as add new entries.
Topics covered on this help page include:
The Search Tab (to define which people, projects/tasks should be included in the resulting matrix grid)
The Plan Tab (displays the matrix planning edit screen for the appropriate time period, projects and people)
You may also be interested in:
Project >> Plan with Grid (for a similar grid management screen used to plan many users for many time periods for a single project)
Manage Projects (Project Profile) (for more information about managing project attributes, assignments, etc.)
Using the various sections on the Search tab, the Resource Planner can control who will be included and how the grid will be laid out.
Plan For -- Defines how the grid will be laid out (e.g. Tasks by People, People by Tasks, etc.), what each cell will represent in terms of weeks, months, years, etc., how many periods will be included, beginning with what date and whether the grid will reflect Hours or FTEs (full time equivalents).
People to Plan -- Defines which users will be included in the resulting output. By default, all users that have existing planned entries for the project or specified task will also be included in the resulting grid (even if they do not have an entry for the time frame specified).
Grid Contents -- Determines additional display and filtering options.
Resource Utilization -- Provides for the ability to display user utilization by user defined color scheme (across projects), to enable the planner to quickly see where users may have availability. To understand what a user is specifically planned for in a period (on this and other projects), you can view the same user in a Resource Allocation report (perhaps in another browser tab).
After supplying the desired selection criteria, click on the Plan tab to display the resulting matrix screen.
Selection criteria for specific lists can be saved by clicking the (![]() ) link after criteria has been entered. This criteria can be later recalled on this screen by selecting a previously saved criteria from the Saved List drop down. Individual saved criteria list can be managed via the Reports >> Saved screen in the My Lists section.
) link after criteria has been entered. This criteria can be later recalled on this screen by selecting a previously saved criteria from the Saved List drop down. Individual saved criteria list can be managed via the Reports >> Saved screen in the My Lists section.
You will need to specify selection criteria in either the "Projects to Plan", "People to Plan" or both filters (in order to prevent someone from inadvertently creating a grid that included all people and all projects).

|
|
|
Which users and projects appear in the resulting matrix (on the Plan tab) depends on the selection criteria defined on this Search tab. In an attempt to prevent a user from creating a matrix that included all users and all projects, you must provide selection criteria for either or both the Project / Person filters.
Specifying the following combination of Projects and People will yield the following results:
Projects w/o People -- list of all projects matching search criteria and any users that have been planned for any of those projects for that particular time frame.
People w/o Projects -- list of all people matching search criteria and any projects that they have been planned for during that particular time frame.
Projects and People -- list of all people and all projects matching their respective selection criteria whether or not they have been planned for that time frame.
Note that inactive projects can appear in the resulting matrix to allow for the planning of users to project prior to them becoming active.
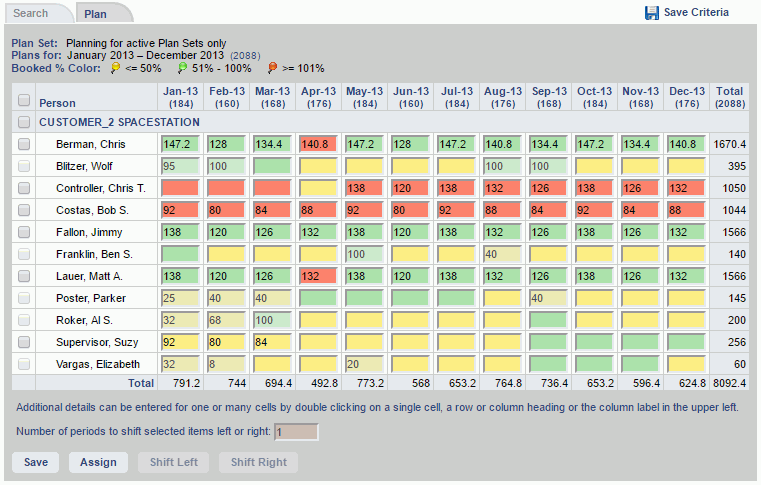
The resulting matrix will resemble the following. The cells in the grid will reflect the number of existing planned work hours for a particular time period (e.g. month). Additionally, the project manager can quickly add or change hours via these cells.
When saved, these cell values will be translated into individual planned work entries having a date range from the beginning of the period to the end of the period (e.g. a monthly June 2005 entry will be saved as 6/1/05 --> 6/30/05). These entries can be viewed and edited via the other planning screens such as the Plan >> List .
Additional Planned Work Details for each cell can be manipulated via the grid by double clicking on a cell, a project/task name, a person's name, or the Project / Person label (to edit the entire matrix).
See the Edit Plan Details section below for additional information about editing additional planned work details.

|
|
Edit Plan Details
The matrix allows for easy entry of hours values, but can also be used to update other planned work entry details. The editing of these details can be accomplished for a:
 Single Cell (supply details for an individual cell in the grid)
 Entire Row (supply details for all displayed cells for a particular row)
 Entire Column (supply details for all displayed cells for a particular column)
 All Cells (supply details for all displayed cells in the grid)
When adding additional hours to empty matrix cells, the plan details supplied will be copied from the next populated matrix cell to the left of the current cell (unless explicitly overridden by one of the Edit Plan Details vehicles described above during the same edit session) .
Cost Rates Overrides on People Plans and User Classification Note
Cost Rate overrides specified on People Plans will only be reflected in reporting output for those users having a classification of Non-Exempt and Non-Employee in the following cases:
-- Dilution is enabled and the Use Plan Cost Rates for Dilution (unatime.cost.dilution.use_plan_rates) property is disabled
Cost Rate overrides specified on People Plans will also be reflected in reporting output for those users having a classification of Exempt in the following cases:
-- Dilution is disabled
-- Dilution is enabled and the Use Plan Cost Rates for Dilution (unatime.cost.dilution.use_plan_rates) property is enabled.
This functionality provides for the ability to move the contents of a row of cells X number of cells to the right or left. When moving a populated cell, the values in the cell, as well as any override values associated with the cell (applicable to People Plans & Assignments only), will be moved. This feature may be helpful, for example, if you need to delay a project for one or several months and would like to shift existing entries without having to re-key them in.
The controls involved in this functionality include the leading check box on each row, the Shift Left and Shift Right buttons, as well as the Number of Periods entry field. Note that you can check the check box at the very top of the grid which acts as a toggle to check / uncheck all available check boxes in the grid.
To move cell contents:
Restrictions/Considerations:

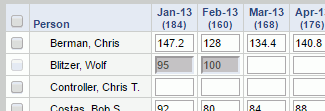
Cells that have a grayed out hours value are not editable. Values appearing in the gray font indicate that the underlying date range for the entries do not align with a particular time period (e.g. in the case of monthly -- they would not fall on the 1st and last day of the month, for example, 3/1/05 --> 5/30/05). In these cases, the hours for the underlying entries are evenly distributed across the monthly cells in an attempt to provide the resource planner/assigner with an idea of the number of total hours for those periods, however, these entries cannot be modified via the grid screen (you'll need to use one of the other planning/assigning maintenance screens).
Likewise, multi-cell bulk edit mechanisms will no longer be available for any rows or columns that contain a grayed out entry including the entire grid (i.e. Name) bulk edit mechanism.
When using the grid for assignments, you may also encounter grayed out cells that have no value at all. These reflect existing assignment entries that were created with no hours budget defined. You cannot create assignments having no hours budget defined via the grid mechanism, however, if an existing entry that was created via another mechanism is pulled up in the grid it will display as a grayed out cell.
If using the Plan Set feature (enabled via the Enable Multiple Plan Sets (unanet.plan_sets.enabled) property), and the plans you are viewing on the grid belong to a locked plan set, all cells on the grid will be grayed out (as you cannot modify plans belonging to a locked plan set).
When using the Resource Utilization feature (ie colorizing the output), the muted versions of red, yellow and green will represent the grayed out cell concept.
Planned work entries can be copied into people assignments by clicking on the Assign button from this screen, and further specifying which entries should be copied. This will navigate you to the People Plans to Assignment screen.
You can also navigate to the Project Profile >> Assign Plans screen where you can further narrow down which plans you would like to copy into people assignment entries.