|
|
|
|
The Accruals option on the Admin menu is available for administrators to assist with the management of the accruals posting process. From this menu option, you can search for and view previously posted periods, view future period forecasts, post and un-post accrual periods, and transfer balances to Carryover plans.
The most likely activity that will be performed on this set of screens is the routine periodic posting of each accrual period. As such, when you click on the Admin >> Accruals menu option, the Post screen >> List tab is displayed by default, including the previous and current months and having the next available accrual period option checked. In this way, an Administrator that regularly posts the accrual periods can simply navigate to the Accruals menu option and click on the Post button.
Your internal policy will dictate when you perform your posting, however, typical usage would include posting a period after all timesheets have been COMPLETED and EXTRACTED for that time frame. Note that you can also automate the accrual post process.
Performance Tip Note: Depending on the number of users in your installation and other factors such as the overall performance of your platform, the activity of posting one or many accrual periods may take up to several minutes. Should this be the case with your installation, you may want to consider running this process at non-peak times to minimize system contention.
Topics covered on this help page include:
Partial Accrual Periods (prorating user accruals for partial period associations)
You may also be interested in:
Managing Leave Balances (for an overview of Leave Balance management options using Unanet)
Accrual Plans Setup (for an overview of Accrual Plan and Schedule setup including a description of the Cap Processing logic and Automated Accrual Posting information)
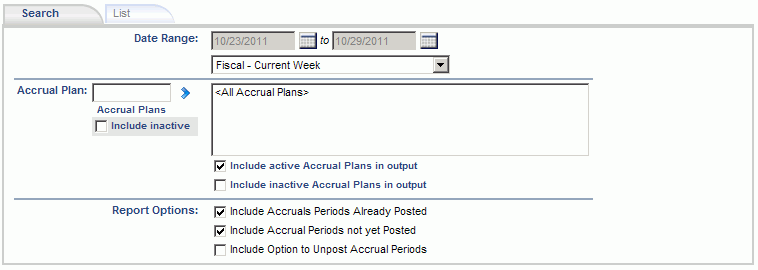
The Search tab is available to refine the contents of the resulting List of accrual periods. Via this screen the Administrator can refine the output by limiting the date range, which accrual plans to include, specifying whether previously posted or yet to be posted periods are displayed and finally whether an Unpost link should be included.

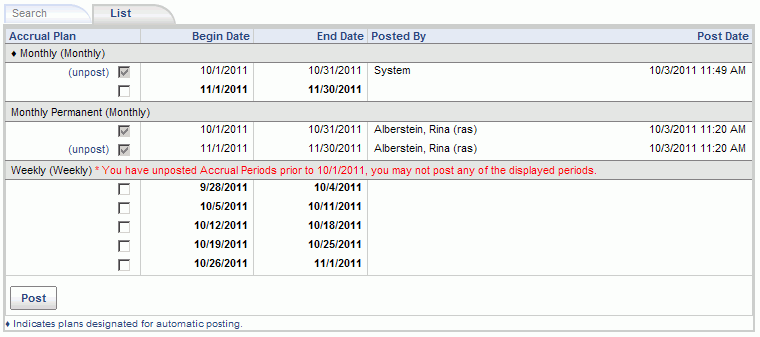
This is the screen on which the Administrator will post accruals for specified accrual plans / accrual periods (when using the 'manual' posting method). In a typical accruals posting process, the Administrator would utilize this screen on a periodic basis to post accrual amounts for one or many accrual plans.
Selecting one or many accrual periods to post and clicking on the Post button will initiate the accrual posting process. This process will post entries to each user's accrual details (for those users associated with the selected accrual plan during the specified accrual period). Additionally, the updated accrued amounts will be copied to an associated Assignment record (budget field) to facilitate timesheet validations / restrictions.
By default, this screen is displayed when the Administrator clicks on the Admin >> Accruals menu option.
Those periods that have previously been posted will appear with a grayed out check box and the Posted By and Post Date fields will be populated. Those periods that have yet to be posted will appear in a bold font. By selecting the Include Option to Unpost accrual Periods check box on the Search tab, you will also see the (unpost) link appear next to the latest posted accrual period (for each listed accrual plan).
Note that periods must be posted in order, that is, you cannot have an unposted period in between two posted periods.
Note that you can post periods for which no users are associated to a particular accrual plan.

Once the post button has been clicked, details associated with the posting will be displayed to the screen and will resemble the following:

These details are also reviewable via the People >> Accrual Details report.
When defining Accrual Plans, you can specify one of several types of caps that can be applied to restrict the amount a user can accumulate.
Currently, there are four options available for Cap Type:
None - If this option is selected, no cap will be applied and a user can accumulate unlimited accrued amounts.
Per-Period - If this option is selected, the cap amounts are enforced each and every time an accrual period is posted.
Annually (Hire Date) - If this option is selected, the cap amounts are only enforced once per year, on the accrual period posting that immediately follows their Hire Date anniversary.
Annually (Calendar Year) - If this option is selected, the cap amounts are only enforced once per year, on the accrual period posting that immediately follows the January 1st calendar date.
When the posting process occurs, the cap limitations are considered and should a cap be exceeded, a comment indicating the cap threshold will accompany any reduced or negative accrual entry.
When are caps applied?
When used, the cap amounts are applied during the posting process. The first accrual period posted after the triggering date will also trigger the application of the cap limitations. The Cap Type specified will determine when exactly any cap limitation is applied as follows:
Per Period -- For these cap types:
the accrued amounts are processed and added to the total accrued amount
then available accrual balance is calculated considering actuals through the end of the period being posted
then the cap logic is applied.
For example, suppose your policy is that you can never accrue time that would leave you with more than 120 available hours, the accrual process would run, first adding the handful of hours accrued for that previous period, then calculating the balance by subtracting the number of actual hours taken, and then the cap limitation would be applied to make sure you are not left with an amount greater than 120.
Annually (Calendar Year)-- For these cap types the cap logic is applied first to the current existing balance (that is, total amount previously accrued minus total actuals taken through the end of the previous accrual period), and then the next accrual amount is applied. The reason these cap types are handled differently is that in the annual scenario, you are typically looking to make sure the user doesn't accumulate and carry more than x hours into the next year (but do not necessarily have any constraint as to the total amount they can accumulate during any specific year).
As an example, an accrual plan of type "Annually (Calendar Year)" -- will be triggered when posting the first accrual period that begins in the new year.
Annually (Hire Date) -- This cap type is very similar to the Annually (Calendar Year) cap type, with two differences:
The "trigger date" is the user's Hire Date (as defined on their Person Profile) vs January 1.
Whether the cap is applied before or after the post can be controlled via the Accrual Hire Date Cap (post first, then cap) (unatime.accruals.hire_date_cap.post_first) property. By default, this property is enabled and thus the new accrued amounts are added and then the cap logic is applied. By disabling the property, the cap logic would be applied first and then the next accrual amount would be added.
As an example, an accrual plan of type "Annually (Hire Date)" -- will be triggered when posting the first accrual period that begins after the users Hire Date.
Which actuals are considered?
In order to determine the number of unused accrued hours for the purposes of the cap logic, the system will use the work date of the time actuals -- to include the time charged to days between the accrual association begin date and the accrual period end date of the accrual period being posted. To be clear, we do not consider actuals charged to future timesheets beyond the end date of the accrual period being posted.
In addition to manually posting accrual plans each period, you can also configure your accrual plans to participate in automated posting. This can be accomplished by indicating your accrual posting type on the Admin >> Setup >> Accrual Plans screen for each type of accrual plan in your system (either manual or automated posting). Additionally, the administrator will need to enable the master Automated Accrual Post job on the Admin >> Schedule screen.
Those Accrual Plans that have been configured to participate in the Automate Accrual Post process will appear pre-fixed with a ♦ symbol. Accrual Plans that participate in the automatic accrual posting process can still be manually posted and unposted. Do note that should you unpost a plan that participates in the automated posting process, the next time the automated post process runs (as defined on the Admin >> Schedule screen) the period will be re-posted (as the process will pick up any accrual periods that meet the criteria to be included in a post process).
The output of the Automated Post run can be optionally sent to one or many users (if configured on the Accrual Plans screen).
Note that the Administrator will set up a single scheduled event (via the Admin >> Schedule screen) which will process any accrual plans configured to participate in the automated posting process. This schedule event will occur on some regular basis (ie perhaps nightly), and when it runs, the system will interrogate all accrual plans that have been configured to participate in the automated process, and look for plans that have either a begin or end date (depending on the option selected for that accrual plan) which is less than the trigger date / time. The frequency of the scheduled event should not be confused with the type of accrual plan period. This single scheduled event will interrogate all plans and run any that are ready to be posted. Those periods meeting the criteria will be posted just as if the administrator had clicked on the post button on this screen.
Example
Suppose you have a Semi-Monthly accrual plan, you might schedule your Automated Accrual Post job to run daily. This will cause the system to check once each day to see if any accrual periods need to be posted. It will only post the semi-monthly period when it is supposed to, either at the beginning of the semi-monthly period or the end of the semi-monthly period as configure on the Accrual Plan setup page. If you have your semi-monthly accrual plan set to post automatically at the beginning of the period, the system would check each day to see if “today” is the first day of the period, and if it is, the post will happen. If “today” is not the first day of the semi-monthly accrual period, no post would occur.
The (unpost) link can be used to "un-do" a posting for a particular period. When unposting a period, you can only unpost one accrual plan / accrual period at a time. This process will add negating entries to each user's accrual details and appropriately update the budget on their corresponding Assignments.
Accrual periods that were both manually or automatically scheduled to be posted can be unposted.
Note that this process may result in a negative value for a person's accrued balance, though any corresponding assignment will never reflect a negative number. This situation could occur, for example, if you have transferred a person from one plan to another (e.g. they were promoted -- and thus zero'd out the balance on their initial plan), and then subsequently you unposted a period for that original plan. In this case, you would be adding negative hours to a zero balance. Should this occur, you may need to utilize the Adjustment mechanism (available on the Person Profile >> Accruals screen) on an individual user basis to establish the appropriate balances.
There are several scenarios where a user may accrue a prorated amount for a particular accrual period. Examples may include:
Users that belonged to two distinct accrual plans during the same accrual period. As an example, you may have a user that is promoted and thus belonged to the Non-Mgmt Plan for part of the period and the Mgmt Plan for the remainder of the period.
Users having a calculated 'months of service' date (based on their Hire Date and the accrual plan schedule) which falls within the middle of an accrual period. For example, you may have a user whose accrual plan schedule has them moving from the year 1 accrual amount to the year 2 accrual amount in the middle of a particular accrual period. They would need to accrue time for the first portion of the period based on the earlier accrual schedule entry and the second portion of the period based on the subsequent accrual schedule entry. Again, the months of service date is calculated based on the user's Hire Date (on their person profile).
Users having a hire date that falls within the middle of their first accrual period, and thus they should only get a prorated amount for that initial period.
Note: the accrual proration functionality is not optional. If this scheme does not match your companies policy, you may need to use the Accrual Adjustment feature to provide the user with a positive or negative adjusting amount per your policy.
In these cases, the system will prorate the various accrual amounts associated with each accrual plan/period for the appropriate number of days. This proration is based on the number of days the user was associated with the particular plan/schedule within the accrual period vs. the total number of days within that accrual period. This is based on total days in the period (not just business days).
Example
Given the example above, suppose the user belongs to a monthly accrual period (the month in question has 30 days). Their hire date anniversary falls on the 10th of that month. The amount that would be accrued for this person would be ( (10 days /30 days) * 1 hour ) + ( (20 days /30 days) * 2 hours ) = 1.366666 hours accrued for that period. This prorated accrual note will be included in the accrual details for that person.
The Carryover feature is available for those customers that have a policy to separately track and potentially limit the time frame that carryover amounts may be used. For example, if your policy indicates that at the end of each calendar year, any remaining leave balance is moved to a different carryover task and must be used by end of the first quarter (or some other date limitation), this feature may be of interest to you. Note that you can additionally, cap the number of hours transferred by supplying a value in the Transfer Cap field..
Note: If your policy is simply to limit the amount of carryover but still allows you to charge that time to the same project, then you probably do not need this feature. Instead, you may want to review the cap feature (which is defined on the Admin >> Setup >> Accrual Plans -- Schedule tab).
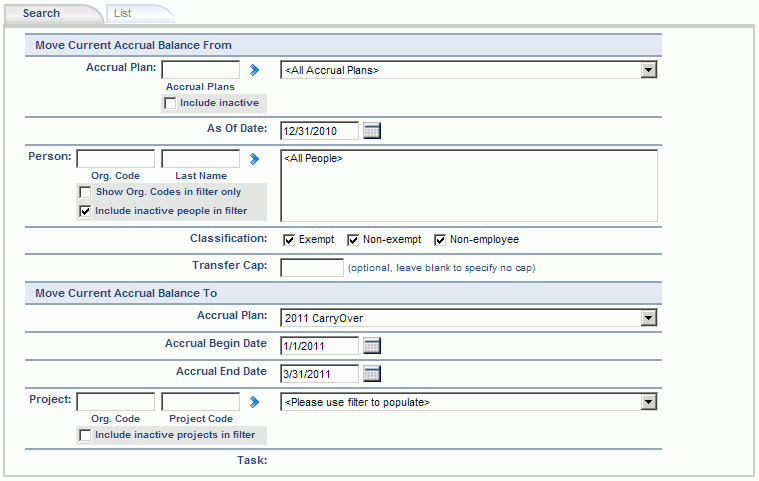
To use the carryover feature, you will need to first define an accrual plan (via the Admin >> Setup >> Accrual Plans screen) having the carryover type check box checked. Then, using this Carryover >> Search tab, you will identify those accrual plans / people for whom you are transferring remaining balances from -- as well as the Accrual Plan, Project and date range you are moving the balances to.
The original Accrual Plans and users associated with those plans remain intact. The only impact to those associations and related assignments is that the balance is effectively zero'd out (having that remaining balance transferred to the special carryover project/task). Future accruals to the original plan / associations will continue and users will continue to charge time against those original project/tasks (presumably after having used up their carryover time).
The As Of Date criteria is used in conjunction with the Classification field (such that we can include users having a particular classification as of a certain date).
The Transfer Cap field can be used to limit the number of hours transferred. If no value is supplied, no capping will occur during the transfer process.

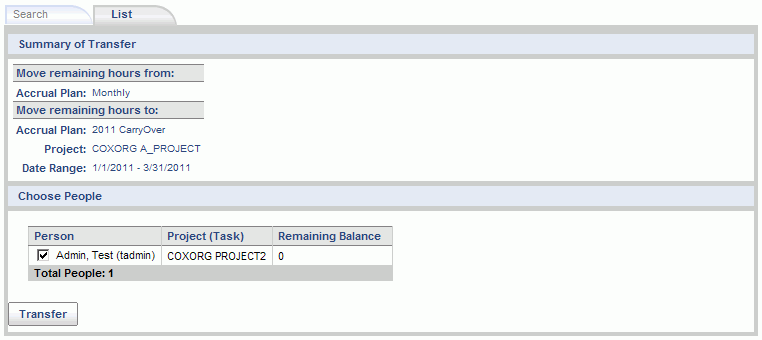
After supplying the desired search criteria, clicking on the List tab will present a screen resembling the following. This screen will contain a recap of the selection criteria specifics as well as a list of those users that matched the search criteria (with their current remaining balance displayed). On this list, you can further identify those users you would like to include in the carryover transfer.
Once all desired options have been specified, clicking on the Transfer button will initiate the transfer. This process will:
update the accrual details on the from plan showing the move of hours (leaving a zero balance on this plan)
update the assignment budget associated with the from plan (leaving a zero available balance -- the budget remaining will equal the amount charged for that assignment date range, thus zero available for future charging)
update the accrual details on the carryover plan for each person showing the move of remaining balance hours
create the associated assignment entries with the specified budget and date range (potentially limiting the amount if a Transfer Cap was supplied)
Note that there is no convenient way to un-do a carryover transfer of hours. Please double check your selection options prior to clicking the Transfer button.
